How to make plastic ceilings?

Watch the video


Plastic ceiling - excellent finishceiling in various rooms. The advantages of plastic ceiling are moisture resistance, ease of installation, the difference in color options and materials, durability. It is also easy enough to wash it, you can hide communications under it. Plastic is not afraid of moisture, so you can safely put it in the bathroom. Let's talk more about how to make plastic ceilings.
Mounting the plastic ceiling with your own hands
Necessary tools and materials
You will need:
- screwdriver or screwdriver;
- hacksaw or bulgarian;
- knife;
- aluminum load-bearing profiles;
- self-tapping screws;
- plastic panels;
- fastening straps;
- ceiling skirting boards;
- corners.
Select panels
Panels are simple and decorative.
Simple panels are panels of white color with a matte texture, on which no additional decorative elements are applied. In retail, they are the cheapest.
Decorative panels are panels on whichdifferent patterns, ornaments of all colors of the rainbow are executed, which amaze the imagination. If you want to make the room unique, then you can easily choose decorative panels. Only they are much more expensive than conventional panels.
Calculation of the required amount of material
First you need to calculate the ceiling area. To do this, multiply the length of the room by the width of the room. Next, divide the area of the ceiling into the area of one panel, so you will know the number of panels required.
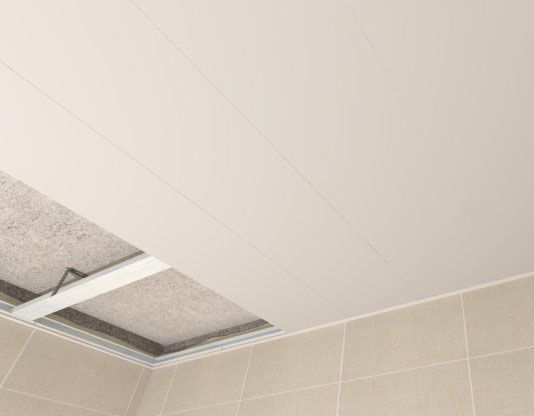
Preparation of the battens
Before fixing the panels, theCeiling: treat with a primer and attach the grate. For grating use aluminum load-bearing profiles section 25x60 mm or wooden bars with a section of 20x25 mm. If you are going to make a ceiling in the bathroom or in another room where there is high humidity, then it is worth using an aluminum profile - it does not rot and does not rust when humidity is high. This can prolong the durability of the structure. In all other cases, you can use wooden slats.
Using a hacksaw or a calf, adjust the sizeprofile for the size of the room. The profiles of the battens should be located perpendicular to the mounting direction of the panels. The distance between the profiles should be between 400 and 500 millimeters from each other. The profiles can be fixed to the ceiling using self-tapping screws.
Strengthening of the lath under the lamps
In the location of light devicesmake the reinforcement of the frame. To do this, attach the supporting profile to the location where the light fixtures will be located. Using a knife, make a hole in the panel under the lamp.
Ceiling height
The height of the ceiling can be chosen any. It is necessary to take into account the height of the light devices, which will be mounted in the ceiling. The height of the ceiling must be several

Mounting the mounting bar
The fixing bar is the bar angle of ninetydegrees. One of its sides is attached to the crate, and the other has a groove into which a ceiling skirting board is inserted. The bar must be mounted on each side of the room. Screw the screws into the middle of the side surface of the bar with a step of twenty-five centimeters.
Fastening of a ceiling skirting board
Ceiling baseboard or fillet allows you to removegaps between the wall and panels. Plinths come in different shapes, patterns and color variations. Choose a ceiling skirting board depending on the design of your room.
- To the previously cut off the width of the wall skirting, fix the corners, snap the plinth into the groove of the fastening bar.
- Fasten the skirting board to the corner and snap into the groove of the fastening bar. Do this action on all sides of the room.
- If there are gaps after installation, they can be carefully sealed with putty.
Panel mounting
- Slide the panel between the baseboard and the bar.
- In many cases, the last panel is not suitable forwidth. In order to insert it, it is necessary to cut it along the entire length by the required amount. It is also worth making holes in the panel in those places in which it will be attached to the grate.
Now every owner will know how to properly make a plastic false ceiling in his room. You can also see other articles on this topic:
- How to make a ceiling from panels
- Than to fasten the plastic panels to the ceiling


